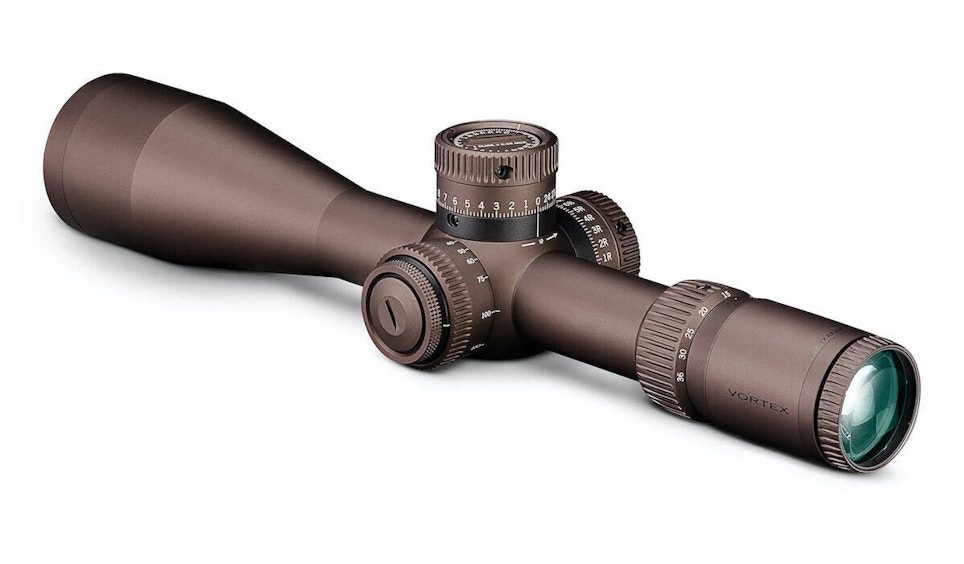
There are a lot of terms to know when talking to customers about riflescopes. First focal plane, second focal plane, reticle differences … the list goes on. Most are usually easy to understand because your customers can visualize them as they are explained. Talking about scope parallax is different.
If you ask 10 rifle shooters to explain parallax, you’re likely to get 10 different answers, and very few of them will be adequate for new shooters to comprehend. Surprisingly, many shooters that have been using scoped rifles for years haven’t even thought about parallax. That’s because it isn’t a major concern when shooting large animals at typical hunting distances. But there’s an expanding class of shooters who seek to shoot long distances with pinpoint accuracy. For that group, an understanding of parallax and how it affects accuracy is crucial to their success. If you’re going to sell optics to these customers, they are likely to be higher-end scopes with very prominent parallax adjustment knobs requiring you to explain how to use them.
Imagine that you’ve sold equipment to a shooter interested in precision rifle competition. You’ve helped them pick out a long-range rifle, a scope, mounts, a bipod and all the other accessories needed for their new hobby. But when they assemble it all and take it to the range, they can’t seem to get the kind of performance they were expecting. Not understanding parallax, they look through their new scope and find that the reticle (crosshairs) seem to “float” on the target. They try to center their eye in the eyepiece, but the reticle still moves around based on their eye position. That’s parallax. More precisely, that is the visual effect of parallax that is out of adjustment. This floating reticle gives slightly different aiming points, so it’s hard to know what’s correct and what’s not. The result is poor accuracy. They will be coming back to see you and will likely think it’s a problem with the gear you sold them rather than an adjustment. You’re going to have to educate your customer about parallax. Let’s see how easy that can be.
Scopes utilize a single reticle instead of separate front and rear iron sights. It’s not necessary to form a sight picture by lining up the sights to the target. The single reticle simplifies aiming. All that’s needed is to line up the reticle with the target and shoot. But, if the shooter hasn’t taken the time to properly focus the scope and then adjust the parallax, the reticle will not be stable relative to the target image.
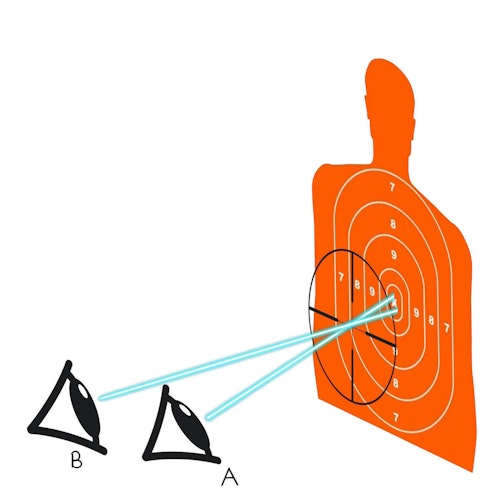
Parallax errors occur when the reticle and the target objective are not on the same plane. If that sounds hard to understand, that’s because it’s hard to visualize without some assistance. Look at Figure 1. The eye starts in position A and looks through the reticle at the target. The scope is lined up, and you’re ready to shoot. But you’ll notice that the reticle appears to be hanging out in front of the target. That’s what it means to say they are not on the same plane. If the reticle was drawn on one sheet of paper and the target on another, there would be a separation between the two sheets. If the eye remained centered in the scope in position A, the parallax error would not cause a problem. But as soon as the eye moves slightly to one side (as in position B), the fact that the reticle and target are on different planes means that the bullet’s point of impact changes. You can see that if the reticle hangs in front of the target, aiming errors will occur based on eye position. Position A has a different point of impact on the target than position B. The only way to get perfect accuracy in this situation is to have perfect eye alignment — something that rarely happens when humans are involved. The result is that the shooter must move the rifle slightly each time the eye is moved. If the rifle is moving, it’s impossible to have the type of accuracy your customer is looking for. They will inevitably miss the center. The farther apart the two planes are, the more parallax will affect bullet placement.
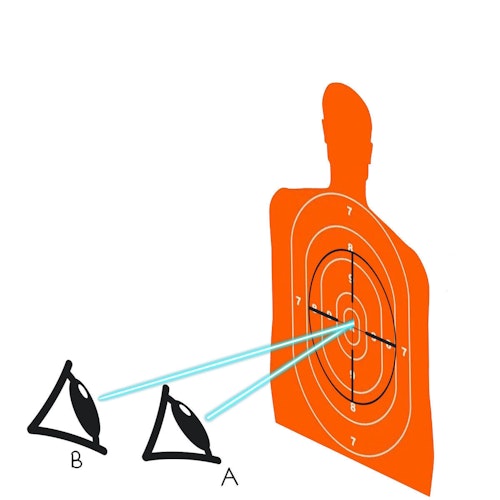
Fixing parallax means that the reticle and target must be adjusted to be on the same plane within the scope. To use the paper analogy, the sheets of paper are brought together so that the distance from the image to the eye are the same for both. They are then on the same plane. To see a representation of what that looks like, see Figure 2, where the reticle and target are together. That’s what the parallax adjustment does. It takes the image of the reticle and the image of the target and matches them together at one position within the scope. Now, look at the difference between eye positions A and B. It no longer matters. Both will give consistent alignment and, therefore, consistent bullet placement on target.
A lot of people mistakenly believe that the parallax is a focus adjustment. That’s because they see the different distance markings on the knobs. There is a separate knob for adjusting focus, but even that isn’t for focusing on the target. It’s designed to get a clear focus only on the reticle. A clear reticle is always the proper starting point for setting up a scope. It’s the first step before making a parallax adjustment.
To focus the reticle, look through the scope at a single-colored surface, such as a white wall or the sky. That will remove background distractions so the eye can focus only on the reticle. Look closely at how clear the reticle appears. Adjust the focus knob until it starts to look more precise, then look away from the scope long enough for the eye to adjust to normal vision. Repeat the process until you have a crystal-clear reticle. At that point, lock the focus in place and forget about it. It will remain adjusted to your eyes going forward unless you drop it or someone changes it.
The next step is the parallax adjustment. This is done by placing the rifle in a stable mount or on a sandbag so that it doesn’t move. Line it up with a target. As you look through the scope, move your eye slightly off-center and see if the target image or reticle shifts. If it does, the parallax is not correct. Adjust the knob and try again. Like the focus adjustment, it may take several attempts before it’s correct. Most adjustment knobs have target distances etched into them to aid in this process. Those will get it close. Continue to fine-tune the adjustment until you can move your eye around and the reticle appears steady on the target. Congratulations! The parallax is now correct, and accurate target alignment will be easy going forward. It will only have to be adjusted when drastically changing distances. If the first target is at 100 yards and the second is at 500 yards, the parallax will need to be re-adjusted to that new distance.
You may have noticed that there are a lot of scopes that don’t have a parallax adjustment. These are known as fixed parallax scopes. They are pre-set from the factory to be parallax-free at a pre-determined distance. This is usually 100 or 150 yards, which are common shooting distances. If you’re shooting at distances close to the adjustment point, you’ll experience no issues. When shooting at 300 yards, parallax will be noticeable, and accuracy will suffer. But most hunters will not notice a difference because the accuracy will still be close enough to hit the game at normal hunting distances. All that is needed is to pick a scope that matches the parallax adjustment to the typical distances expected. Most shooters in precision rifle shooting prefer having the ability to adjust for varying distances. That’s why most mid to high-end scopes now have the dial prominently located near the other scope adjustment knobs.
Explaining parallax may be more complicated than talking about reticles, but it’s worth the time for those customers intending to shoot with precise accuracy. Do you remember the upset customer that thought you’d sold him bad equipment? Now that you can explain parallax, they should be able to correct the errors that led to their problem. But don’t stop there. Make it real to them. Pick up a scope with a parallax adjustment and intentionally misadjust it. Let them see the effects. Then adjust it and hand it back. Your customer will leave the store excited about the knowledge you’ve provided and excited to return to the range again. You’ll be a gun store hero!


